
DISCLOSURE: THIS POST MAY CONTAIN AFFILIATE LINKS, WHICH MEANS I GET A COMMISSION IF YOU DECIDE TO MAKE A PURCHASE THROUGH MY LINKS, AT NO COST TO YOU.
So you’ve decided that you want to start a blog. But you’re not sure of the how. You don’t need a large budget to create a blog. You can get started for under $100.
Today I’m going to show you how to start a blog using WordPress. If you’re ready to create your WordPress blog, click here to start , then keep reading, and follow the steps!
Before you can start creating blog posts and content, you must first register your domain name with a reliable host. It’s a simple process if you follow the steps in this tutorial.
Bluehost is the perfect place to start a website. They offer a free domain name and make it easy to install WordPress. So let’s move forward with getting you setup with hosting.
Step 1: Go To Bluehost.com
Visit Bluehost.com
Use this link to get our latest Bluehost discounts updated daily, including a free domain (in your first year).
You’ll know you’re in the right place if you see this picture below:

Click on “Get Started” so you can go to the next step, which is step 2.
Click on Choose Plan and it will take you about halfway down the page. Nice work.
Step 2: Choose Your Hosting Plan
Note: What is your website’s goal?
Are you building a small blog website or a large blog with multiple authors? I like to encourage my clients to start small and grow as they go.
For this Bluehost WordPress install, we’ll opt for the “Basic plan” shared hosting plan which is highlighted in red below.
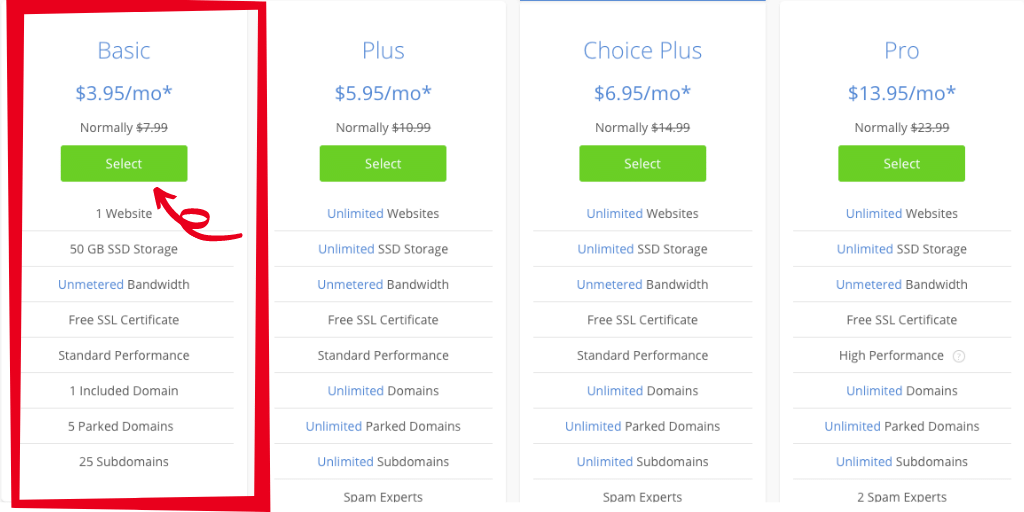
If you’re curious about shared hosting (a.k.a shared server) it’s the most commonly used and most affordable option for beginners.
When we sign up for one of Bluehost’s shared hosting plans, we won’t have to worry about any techie stuff, unless you want to.
Step 3: Grab Your Domain Name
After selecting your plan, the next step presented to you is to set up a domain which is also your website’s address.
If you have one in mind already, that’s awesome! If not, no worries… I’ve got some hints and suggestions for you below.

To reinforce what you’re probably already thinking:
Your domain should be as short and simple. Two words are BEST: think “FaceBook, YouTube, NetFlix, LaneBryant, BestBuy, etc. Still, stuck? Follow these basic domain name DOs and DON’Ts:
- Always keep it short and simple
- No hyphens dashes or symbols
- Firstnamelastname.com is always good
- 1-2 keywords will help you rank in Google
- .com is the most recognizable and profitable
If you already have a domain name you previously registered, just enter it in the “Use a domain you own” box.
Step 4: Fill on Your Basic Details
The next step in our register your domain with Bluehost tutorial is simply to fill in the basic required information. The information you’ll need to provide is your first name, last name, country, street address, city, state (if applicable), zip code, phone number, and email address.
Please note that details and receipt for your installation will be sent to the email address you provide.
You don’t need to enter a business name.

Step 5: Check Your Package Information and Package Extras then Finish the Registration
The next step is to scroll down and check your package information. I recommend signing up for 12 months. Do take a look at the add-ons that are included by default. You can uncheck all of them if you’d like (I recommend unchecking all of them).

Here’s what to consider:
Domain Privacy Protection: Costs $0.99/month (billed annually at $11.88). Adding Domain Privacy + Protection masks your personal information from the whois database, which is publicly visible to anyone on the internet. Easily protect your personal contact information from marketers, spammers, and unwanted solicitation by adding Domain Privacy + Protection.
SiteLock Security: Costs $1.99/mo (billed annually at $23.88) SiteLock automatically scans your website for malware to ensure they are not being blocked or spammed. Verifies your email address, phone number, and physical address for customers if you plan to create an eCommerce website.
CodeGuard Basic: Costs $2.99/mo (billed to the end of your hosting term). This lets you back up your site regularly, basically making it easy to revert back to a previous save if you make a mistake.
Bluehost SEO Tools Start: This feature runs you an extra $2.99/mo (billed annually at $23.88/hr). Bluehost says this tool will help with your Search rankings aka make you rank higher in Google.
1 Office 365 Mailbox: This package extra comes free for 30 days, but we all know how free trials work. It’s a reliable and safe email provided by Microsoft.
Each one of these extras can be set up for free using a plugin or workaround. For example, you can accomplish what Bluehost SEO Tools Start gets you by installing Yoast SEO for free, which is what most WordPress sites use. If you have questions, I’d be more than happy to explain in greater detail later.

Take note that the amount you’ll be charged will be billed annually. You might be surprised that your monthly cost of for example $3.95 is already discounted, this price already reflects a discount.
Step 6: Getting The Best Bluehost Discount / Coupon for this Bluehost WordPress Install?
Need another discount? Well, Bluehost has actually never offered coupon codes, but that I like to find ways to get a better discount. If you want the discount, you can move your mouse to the edge of the screen and see if Bluehost will show you the “before you go” discount. Like this:

Click Claim Savings and you’ll get an additional discount!
Make sure to use this link to activate it and make sure you get to all the correct pages.

Read the fine print at Bluehost before making your final decision.
Bluehost has a 30-day money-back guarantee so you can get your money back if you don’t like your website. But this doesn’t apply to the domain name. So while you get a free domain at Bluehost, if you do cancel the hosting, they will deduct the cost of your domain name from your reimbursement.
Once you’ve completed setup (click Submit) then you should see nice confirmation page:


Click on Create Account, and your next steps are pretty simple.
Congrats, you are now a member of Bluehost and are ready to install WordPress and start blogging.
Step 7: Now it’s time to login and install WordPress. Use your domain and password that you created in the previous steps.

Step 8: Enter your desired name and tagline. Click the section that asks you if you want to start a blog. Click continue.

Step 9: Select the options that best suit your blog needs.

Step 10: Select your theme.

Step 11: Congrats! You’ve officially set-up your WordPress blog.
You should now see cpanel section of your site. You can use the checklist as a guide to complete your blog set-up. Click on the WordPress button to be taken to your WordPress dashboard where you can start creating blog posts.

Step 12: Hello WordPress!
This is your WordPress dashboard. This is where you can create your blog posts, add new pages to your blog/website. Click the add post button to create your first post.

That’s it! You are now ready to start blogging. I hope that this tutorial was easy to follow. In the next tutorial, I will be teaching you how to create SEO-friendly blog posts. If you have any questions on how to start a blog, do not hesitate to contact me 🙂