
by Olivia Moore | Jan 26, 2023 | Web Solutions
When you are first starting out, it’s super important too, at some point, to create a website for your business. However, with so many website hosting options available, it can be a bit overwhelming to choose the right one for your business.
I’ve been creating websites for a minute now, and one hosting provider that I recommend for new business owners is Bluehost. Here are a few reasons why you should consider using Bluehost for your WordPress website:
They make it easy for you to get started
Bluehost makes it easy to get started with your website by providing a one-click WordPress installation. So instead of it being a long drawn-out process, you can have your website up and running in just a few minutes, without needing to know the tech stuff.
They make it affordable
Bluehost offers a variety of hosting plans that are tailored to the needs of small businesses. Their basic plan starts at just $2.95 per month, making it an affordable option for new business owners.
They offer excellent customer support
Bluehost offers 24/7 customer support, so you can get help whenever you need it. It doesn’t matter if you have a question about setting up your website or need some help with a technical issue, their team of experts is always available to help.
They offer a 30-day money-back guarantee
Bluehost offers a 30-day money-back guarantee, so you can try their service risk-free. If you’re not satisfied with their service, you can simply cancel within the first 30 days and receive a full refund.
Overall, in my opinion, Bluehost is a great choice for new business owners looking for an easy, affordable, and secure hosting solution for their WordPress websites. Bluehost is affordable and provides excellent customer support, and they make it easy to quickly get your business online and reach a wider audience.
by Olivia Moore | Aug 11, 2022 | Web Solutions
Introduction
Most people know Canva as a simple online design tool… And it is! You can easily create professional designs by dragging and dropping your content onto pre-made templates. But there’s a lot more to Canva than that! In fact, there are tons of ways you can use the platform to improve your business. Here are my top five tips for how to use Canva for your business:
1. Design your branding
It’s time to get creative and design your branding. Canva has a ton of free resources for you to use, including:
- A free trial if you want to try out the tool before committing
- Thousands of templates that are ready to use (with more being added every day)
- Millions of images and videos available for your projects
- Hundreds of fonts that are easy on the eyes
- Lots and lots of layouts for all kinds of business needs
2. Create templates for social media posts
Social media posts are more than just pictures of your brand’s logo. They’re the way to keep your followers engaged, stay top-of-mind, and grow your audience. But creating them can be a bit time-consuming, especially since every social platform has its own rules for what you can and can’t post.
Canva has a huge selection of free templates that will save you time during this process by providing pre-made designs in sizes that fit each network’s specs. All you have to do is select a template that matches the look and feel of your brand while incorporating these elements:
- Your logo
- A call-to-action (CTA) such as “like” or “comment”
- A hashtag if applicable (for example #onemooresolutions)
3. Design and create marketing materials
Marketing is the most important part of any business. You can make all the money in the world, but if no one knows about your product or service, then it’s not worth anything. This is why creating marketing materials is so important! You can use Canva to design everything from social media banners and Facebook cover photos to flyers and magazine advertisements. If you’re worried about being able to make something good on your own, don’t worry: Canva has templates for almost any kind of project you could think of—and if there isn’t one already available with the right look for what you have in mind, making it yourself couldn’t be easier! Just choose a template based on what type of material it will be—whether that’s print or digital—then customize it however you like by adding text and images from their library (or upload your own). Easy-peasy!
4. Get creative with video templates
You can easily create a video with Canva. The hardest part is deciding which template you want to use. With over 3,000 to choose from, it’s hard to know where to start!
So where do you begin?
Well, first of all—good news! All of the templates are completely free for personal use. You can even use them commercially if you have a paid account on Canva (paid accounts start at $9 per month).
You’ll find hundreds of designs that are already laid out for you—all you need to do is add text and images with drag-and-drop functionality. It couldn’t be easier!
5. Create stunning presentations
If you’re looking to create a presentation that will stun your audience, Canva is an excellent tool. With more than 100 templates for presentations and pitch decks, you can easily find the right one for your needs. You can also customize the template to fit your brand by changing colors and fonts.
For those who don’t want to use a pre-made template, Canva makes it easy to create your own using its built-in design tools. You can add images, text, and other elements to build up the look of your presentation with ease. You can also use Canva on mobile devices like tablets and phones so that you have all the information you need when presenting away from a computer screen!
Doesn’t that sound better than using Powerpoint ?!
You can do a lot with Canva!
You can use Canva to design your branding, create templates for social media posts, and even design and create marketing materials. Using the drag-and-drop editor, you can get creative with video templates or create stunning presentations. The possibilities are endless!
Conclusion
And that’s it! I hope you found these tips helpful, and that they’ll help you grow your business. If you need some help with using Canva , feel free to contact me.

by Olivia Moore | Aug 4, 2022 | Web Solutions
So you need to choose a theme for your WordPress website. You have options. You can get create a custom website using Divi, or you can find a template/theme on Envato. Today I’m going to share a few tips on how to choose a theme that will meet your needs, as well as fit your website’s style and brand.
1. The first step is to think about what kind of website you want your new theme to create, and then search for themes that match your vision. For example, if you want a blog-style site with lots of text and images, then look for “minimalist” or “clean” themes. If you’re looking for an online store, try searching for “e-commerce” themes instead.
2. Once you’ve narrowed down which type of theme seems to work best for your needs, go through all the available options until you find one that matches everything on your list.—and then take it for a test drive! You can install any theme from Envato onto any WordPress site with one click (no coding required!), so don’t be afraid to try out several options before deciding which one feels like home. Once you’ve found a theme that you like, you can either download it from Envato or buy it on the spot.
3. Once you’ve got your theme installed, it’s time to start making changes! You’ll want to customize things like the header image, color scheme, page layout, and more. This is where it pays off to have a good idea of what you want out of your site before diving into the design process. If you don’t know what you’re looking for when you’re browsing themes, it can be hard to know when one is perfect for your needs.
4. If you’re not sure how to make changes to your website’s design, don’t worry! There are plenty of resources online that can help you learn about HTML, CSS, and other coding languages. You could also contact me to customize your site for you.
Happy choosing 🙂

by Olivia Moore | Jul 28, 2022 | Web Solutions
Introduction
QuickBooks Online ( affiliate link) is a great program for small businesses. It’s automatic, effortless, and does the math for you. However, it can only be as effective as the information you put into it. That’s why it’s important to customize QuickBooks Online with the right types of accounts and classes so you can get the most out of your software. If you are self-employed, you may want to start with QuickBooks Self-employed. Here are some tips on how to get started using QuickBooks Online efficiently and effectively:
Add your bank accounts.
QuickBooks Online makes it easy to import your bank accounts into the app. You can do this in one of two ways:
- Import accounts from a CSV file.
- Import accounts from an Intuit account.
- Import directly from your bank’s app directly
You can always add new Accounts later when you need them.
If you’re not sure which accounts to add right now, don’t worry—you can always add them later. You don’t have to set up all your business accounts at once, and there is no “right way” to do it.
Track your money with the Dashboard reports

There are many ways to track your business finances and make sure you’re on top of things. One of the easiest ways is with QuickBooks Online’s Dashboard reports.
The Dashboard is a great way to get a quick overview of how your business is doing financially and can help you spot trends or potential issues, like slow-moving inventory or customers who haven’t paid their bills in two months.
Add or Update Categories
You’ll want to update or add new categories for the items you tend to buy regularly like office supplies and business expenses – items that come up on a weekly or monthly basis. As a small business owner, it’s important to track your income and expenses so that you can stay profitable.
Conclusion
I hope these tips have helped you get started with QuickBooks Online. QuickBooks Online is a great way to keep track of your business expenses and make sure that you’re meeting all your accounting obligations. I know that setting up can sometimes be confusing, but once you get going there are plenty of features that will help make your life easier!
by Olivia Moore | Jul 12, 2022 | Web Solutions
Writing is hard!
But it doesn’t have to be! Writing is a must in your daily business activities. Here are 3 tools that can help you write better web copy:
1. Grammarly

Grammarly is a free, browser-based tool that checks your writing for grammar, spelling, and punctuation mistakes. It also highlights issues like passive voice, overuse of adverbs, and more. If you’re looking to make sure your writing is on point before sending it off in an email or posting on social media, this is a must-have tool.
2. Hemingway App

The Hemingway app helps you write clearer by identifying the most complex parts of your text. It does this by highlighting words that are hard to read (like long sentences) in red, so you know exactly where to focus your attention as you revise. If you’re struggling with making your writing easy to read and understand, this app will definitely come in handy!
3. Wordcounter
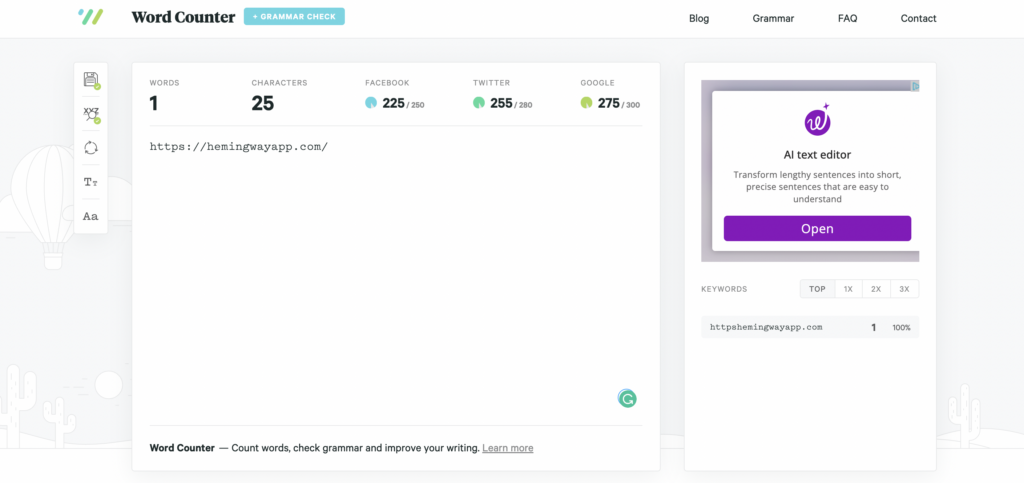
Wordcounter is another free tool that helps you streamline your writing by showing you how many words are being used in each paragraph of your text. This is another great way to avoid filler words like “very” or “really” because they can add unnecessary bulk to your prose without adding any real impact. You can also use this tool to see how many times certain keywords appear throughout the document – this can be helpful if you want to make sure that certain topics are being mentioned at appropriate times throughout each piece of content (such as search engine optimization).
I hope this helps you guys out and saves you a bit of time. Now go get to writing and make the world a more interesting place.


