Meet Janelle. She is a full-time natural hair stylist who spends about 6 days per week servicing clients. She primarily markets her business via social media on Facebook and Instagram. She has a steady flow of clients but wants her clients and future clients to have one space where they can contact her outside of social media. She’s on the fence about investing in a website and isn’t sure if she has everything she needs to design one. Today I’m going to show you how Janelle can combine what she has with what she needs and create a nice home page.
Ok the first step is figuring out what Janelle has so far:
Sounds simple right? Well, there’s more to it, but this is a great way to get started instead of overthinking or procrastinating because it’s too complicated.
Janelle and I worked together to come up with a super simple homepage that not only tells her story but gives her clients the opportunity to get in contact with her. Eventually, Janelle can add email marketing, e-commerce, and a booking calendar. This gives her a great foundation to start.
If you are on the fence or frazzled about where to start, I completely understand. Use this free worksheet that will help you pull the pieces together.
It’s time to learn how to sell your services online.
It’s safe to say that Covid is here and we have no choice but to make some pivots and changes. I wrote about what it means to Digify your business. This is one step you can take to automate some of your processes.
As a service provider, instructor ( yoga, dance, personal trainer, etc), or coach, you want to be able to offer virtual services… and get paid for them. You also want the process to be as simple as possible.
You can continue to sell in your DM and manually send links and email back and forth…
Oh, and drop your CashApp link for payments…
Or you can automate and integrate with the use of a few dope tools.
There are three tools you can use to get the job done. They are:
Calendly
Stripe
Zoom
Step 1: Create your event in Calendly
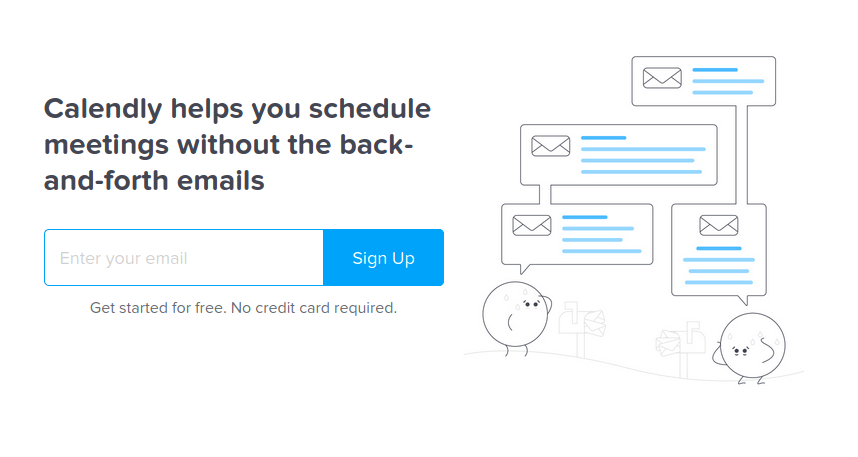
Calendly is one of my favorites. This tool allows you to create online bookable events that are synced with your calendar. You simply sign up for an account, connect your Google or Outlook calendar, and set up your events.
As a new user, you are able to use all features of the paid plan for 14 days. After that, you are downgraded to a free plan. To use the Stripe integration, you need to be on the 12$/month plan. (Compare plans and pricing)
After you’ve set up your account, you can start creating bookable events.
One-on-One or Group events can be created. When choosing Group events, you can set a number for max. invitees for a booking.
But as you can see in the list above, it is also possible to choose Google Meet, GoToMeeting, or provide any type of location details.
For each bookable event, Calendly creates a unique link that you can share with anyone online.
Ok moving on…
On the next screen, you can set when people can book this event. Double-check the time zone and choose the length of time for the call/event.
Calendly also creates a central landing page for your account that shows all bookable meetings, if you do not want that specific event to be listed on that page, make the event secret.
Other things you can do in Calendly are:
Invitee Questions: Ask questions to make the online event a success. For example, ask your attendees to provide the material you want to discuss, which questions they want to discuss, etc.
Notifications and Cancellation Policy: Customize all email notifications (confirmation, cancellation, reminders) and add a custom cancellation policy.
Confirmation page: You can set a custom confirmation page that a user gets sent to after making a booking.
Collect Payments: Stripe or Paypal
Now it’s time to create your Stripe account before you can finish setting up your Calendly event.
Step 2: Connect your Stripe Account
You need to set up a Stripe account to be able to accept payments via Calendly events. Setting up your Stripe account takes about 10-15 minutes, or faster, depending on your business’s location.
Using Stripe does not involve fixed monthly costs, instead, they take a percentage from each transaction.
After you’ve set up your stripe, head over to the integrations page of Calendly. Click on Stripe and connect your account.
If you have finished connecting your account, select Stripe as a payment option in your Calendly event.
Now you are finished setting up your first Calendly event and can start promoting the service. When customers click on your event, this is what they will see. As you can see the dates that are available are highlighted and the cost is listed to the left. Once they click on their desired time, they must enter their card information and pay to book the session.
After a booking is made, a calendar event will be added to the customer’s calendar and your own.
Within that calendar invite, details for the Zoom call are added automatically.
Conclusion
This was a short tutorial on how to sell your services online with Calendly.
Calendly, Zoom, and Stripe can be used together to sell your services online.
You share the link, they choose a time, pay, and get the zoom link via email.
Yesterday my daughter, Kimani, launched her very first website. If you don’t follow me on Instagram or Facebook, you may have missed it.
As much as I wanted to do it for her, I thought it would be a great opportunity to learn how to do it herself. Today I’m going to walk you through the steps Kimani took to launch her site and also add her own line of apparel and mugs.
DISCLOSURE: THIS POST MAY CONTAIN AFFILIATE LINKS, WHICH MEANS I GET A COMMISSION IF YOU DECIDE TO MAKE A PURCHASE THROUGH MY LINKS, AT NO COST TO YOU.
Site Creation and Launch Steps
Before she touched her computer, I encouraged her to pull out a pen and paper and plan as much as she could.
Step 1 : Research and Plan
Kimani sat and did a brain dump of all the things she wanted to see and do with her new website. She followed the steps in the Anatomy of a Website E-book to plan content for each page. She also chose her fonts and brand colors that she wanted to use on her website and graphics.
She had a few options in mind when it came to business names, but she ultimately decided on Prism Ink Creations, which included her love for rainbows and the art of drawing/sketching. Once she decided on a name, she decided to design her own logo.
Step 2: Purchase domain and hosting
Because she took the time to think of her business name in advance, creating a domain was simple. She did a search to see if prisminkcreations.com was available, and luckily it was available. We worked together to register her domain with Bluehost, and used their quick WordPress installation.
We decided to use a premium drag & drop theme and builder so that Kimani can easily change her design if necessary.
Step 4: Design and add content to each page
Using the content she created from step 1, she created each page of her site.
Apparel & Mug Creation Process
Step 1: Created design(s) for her apparel and mug line
Kimani initially sketched her designs, then we had them converted to a digital format. She then downloaded the file with a transparent background in png format.
Step 2: Installed and configured Woocommerce plugin
Woocommerce is a shopping cart plugin that will be used to sell her products.
Step 3: Signed up for a payment processor ( PayPal, Square, Stripe, etc.)
Printful is a print on demand company that will handle the creation and shipping of her products.
Step 5: Installed and set – up printful plugin
Step 6: Chose & customized her products in Printful
Step 7: Add products to the Printful store
Final Steps:
Once it was all said and done, Kimani and I worked together to test the site to make sure it was not only responsive, but also to make sure that everything was functioning as it should.
Kimani admitted that at times her frustration would get to her , but she is beyond grateful that she was able to push through and get it done. Click here to check her website and product line.
So when it comes to launching, upgrading or maintaining your WordPress site, it doesn’t have to be difficult or overwhelming. The key is to take things one step at a time.
If you need some help with launching your website or upgrading the one you have, do not hesitate to contact me.
You don’t need to be rolling in dough to launch a WordPress site. In fact, you can launch a site on a small budget. Today I’m going to show you how to launch a WordPress blog for under $45.00.
Oh and by the way: Thispost contains affiliate links, meaning that if you choose to click through and make a purchase, I will receive a small commission at no cost to you.
Costs
The costs for building a WordPress website can range from low to Woah! There are many factors to take into consideration when you decide to launch a WordPress site. Here are the main things you need to purchase to launch your site: *If you decide to DIY
Domain & Hosting
Theme
Plug-in(s)
WordPress Hosting
Purchase hosting with a company that offers you free domain registration. Some hosting providers offer domain registration free with the purchase of a hosting package. In fact, Bluehost, the company I use to host all of my sites, is offering web hosting for $2.95 per month for a year of hosting. This is a part of their Black Friday deals. That’s 35.40 for one year of hosting and a free domain)
WordPress Theme
Use a FREE WordPress Theme. There are many options when it comes to choosing a theme. I prefer a premium one, but you can start with a free theme until you’re ready to upgrade. Use this link to search for Free WordPress themes.
Plug-ins
Use FREE Plug-ins. The WordPress repository has a ton of plug-ins, some of which are free. Just remember to write out your list features, search, compare your options, and choose ones that have been updated recently. Some of my favorite free plug-ins are Yoast SEO, Contact Form 7, and Classic Editor, just to name a few.
So let’s do the math
Domain & Hosting Costs:$35.40
WordPress Install costs:$0.00
Plug-Ins:$0.00
Theme:$0.00
Grand Total: $35.40
So for less than the costs of a new pair of shoes, you can launch your WordPress site. Need some help with launching a WordPress site? Contact me to chat about your next steps.
Don’t let the Covid-19 restrictions take you out of the game…
Problem: You’re a service provider who normally meets with clients in person. Due to Covid-19, your face to face visits are limited or don’t exist. You need a solution to be able to schedule consultations, collect payments, and meet/chat with your customers.
Solution: Digify your Business
That’s right. It’s time to Digify your business. I’m not asking you to create a digital version of yourself or become a programmer…( breathe ok) . But I am asking you to open your mind to add some solutions to your current business. If you have a website or landing page already, then you’re halfway there. If not that’s ok too.
Oh and by the way….this post contains affiliate links.
How to Digify Your Business
So how do you digify your business? You choose one part of your business that would normally be done in person and find a digital/web solution.
Let’s use the consultation as an example. Almost every service business has some sort of consult which is usually done in person or over the phone. Digifying the process not only saves you time and energy, but you’ll be able to get as much information as possible before deciding if you want to work with the potential client. Here are the items you need to conduct a consultation in person:
A Consult Form – Use this form to collect basic information and ask any questions you’d normally ask during a consultation. Questions vary depending on your industry.
A calendar – use this to schedule your consultations and future appointments
Your 2 eyes ( 4 if you wear glasses) – use this to make eye contact and connect with your client
All of these items can be digitally/virtually done.
You can use Gravity Forms to create consultation forms. Calendly to accept appointments and payments, and Zoom for video conferencing. If you have a WordPress site, all of these can be added to your site and automated. This ensures that potential clients can book you while you sleep. You can also set up an autoresponder to let them know what to expect next.
Creating a website doesn’t have to be overwhelming or challenging. It can be done in a day if you are prepared enough beforehand. But before you can create a website you need to register your domain name and hosting – which is a simple process if you follow the steps in this tutorial. If you’re ready to register your domain, keep reading, and follow the steps!
Bluehost is the perfect place to start a website. They offer a free domain name and make it easy to install WordPress. So let’s move forward with getting your domain and hosting.
Before we start: I may earn a commission if you make a purchase through one of our links. Thanks for your support!
Use this link to get our latest Bluehost discounts updated daily, including a free domain (in your first year).
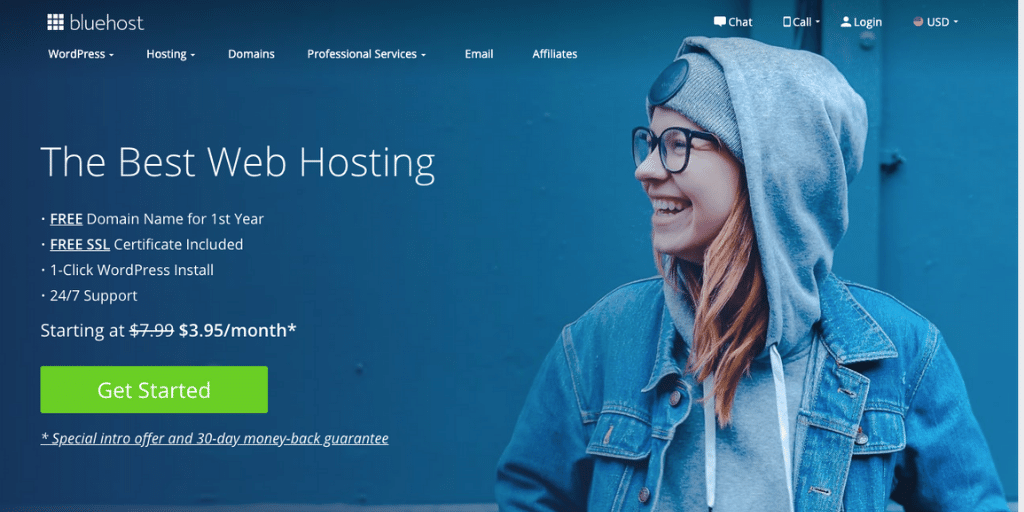
You’ll know you’re in the right place if you see this picture below:
Click on “Get Started” so you can go to the next step, which is step 2.
Click on Choose Plan and it will take you about halfway down the page. Nice work.
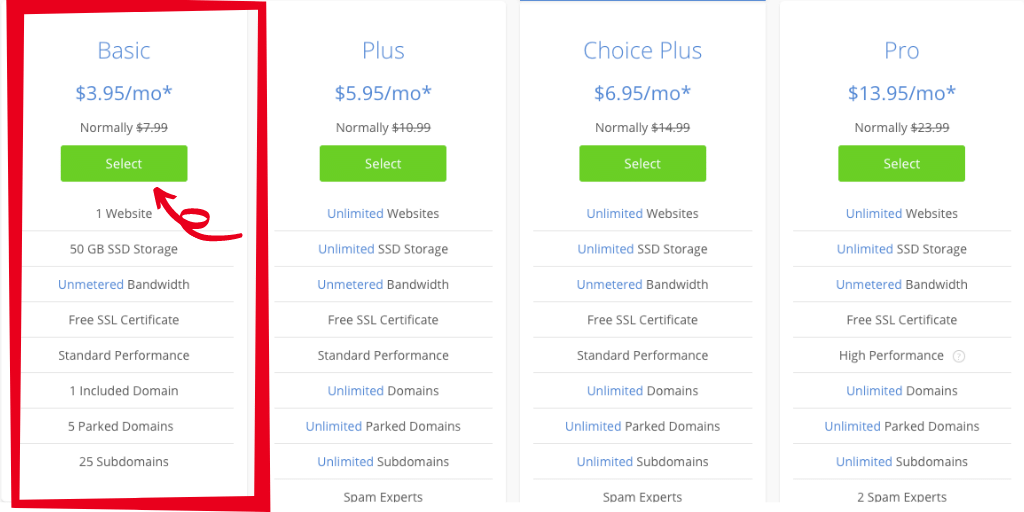
Step 2: Choose Your Hosting Plan
Note: What is your website’s goal?
Are you building a small blog website or a large blog with multiple authors? I like to encourage my clients to start small and grow as they go.
For this Bluehost WordPress install, we’ll opt for the “Basic plan” shared hosting plan which is highlighted in red below.
If you’re curious about shared hosting (a.k.a shared server) it’s the most commonly used and most affordable option for beginners.
When we sign up for one of Bluehost’s shared hosting plans, we won’t have to worry about any techie stuff, unless you want to.
Step 3: Grab Your Domain Name
After selecting your plan, the next step presented to you is to set up a domain which is also your website’s address.
If you have one in mind already, that’s awesome! If not, no worries… I’ve got some hints and suggestions for you below.
To reinforce what you’re probably already thinking:
Your domain should be as short and simple. Two words are BEST: think “FaceBook, YouTube, NetFlix, LaneBryant, BestBuy, etc. Still, stuck? Follow these basic domain name DOs and DON’Ts:
Always keep it short and simple
No hyphens dashes or symbols
Firstnamelastname.com is always good
1-2 keywords will help you rank in Google
.com is the most recognizable and profitable
If you already have a domain name you previously registered, just enter it in the “Use a domain you own” box.
Step 4: Fill on Your Basic Details
The next step in our register your domain with Bluehost tutorial is simply to fill in the basic required information. The information you’ll need to provide is your first name, last name, country, street address, city, state (if applicable), zip code, phone number, and email address.
Please note that details and receipt for your installation will be sent to the email address you provide.
You don’t need to enter a business name.
Step 5: Check Your Package Information and Package Extras then Finish the Registration
The next step is to scroll down and check your package information. I recommend signing up for 12 months. Do take a look at the addons that are included by default. You can uncheck all of them if you’d like (I recommend unchecking all of them).
Here’s what to consider:
Domain Privacy Protection: Costs $0.99/month (billed annually at $11.88). Adding Domain Privacy + Protection masks your personal information from the whois database, which is publicly visible to anyone on the internet. Easily protect your personal contact information from marketers, spammers, and unwanted solicitation by adding Domain Privacy + Protection.
SiteLock Security: Costs $1.99/mo (billed annually at $23.88) SiteLock automatically scans your website for malware to ensure they are not being blocked or spammed. Verifies your email address, phone number, and physical address for customers if you plan to create an eCommerce website.
CodeGuard Basic: Costs $2.99/mo (billed to the end of your hosting term). This lets you back up your site regularly, basically making it easy to revert back to a previous save if you make a mistake.
Bluehost SEO Tools Start: This feature runs you an extra $2.99/mo (billed annually at $23.88/hr). Bluehost says this tool will help with your Search rankings aka make you rank higher in Google.
1 Office 365 Mailbox: This package extra comes free for 30 days, but we all know how free trials work. It’s a reliable and safe email provided by Microsoft.
Each one of these extras can be set up for free using a plugin or workaround. For example, you can accomplish what Bluehost SEO Tools Start gets you by installing Yoast SEO for free, which is what most WordPress sites use. If you have questions, I’d be more than happy to explain in greater detail later.
Take note that the amount you’ll be charged will be billed annually. You might be surprised that your monthly cost of for example $3.95 is already discounted, this price already reflects a discount.
Step 6: Getting The Best Bluehost Discount / Coupon for this Bluehost WordPress Install?
Need another discount? Well, Bluehost has actually never offered coupon codes, but that I like to find ways to get a better discount. If you want the discount, you can move your mouse to the edge of the screen and see if Bluehost will show you the “before you go” discount. Like this:
Click Claim Savings and you’ll get an additional discount!
Read the fine print at Bluehost before making your final decision.
Bluehost has a 30-day money-back guarantee so you can get your money back if you don’t like your website. But this doesn’t apply to the domain name. So while you get a free domain at Bluehost, if you do cancel the hosting, they will deduct the cost of your domain name from your reimbursement.
Once you’ve completed setup (click Submit) then you should see nice confirmation page:
Click on Create Account, and your next steps are a breeze. Congrats, you are now a member of Bluehost and are ready to take the next steps to get your website online!
I hope that this tutorial was easy to follow. If you have any questions on how to register your domain with Bluehost, do not hesitate to contact me 🙂